
Last Updated: October 31, 2026
Quick Summary
Expandable wine racking is a modular storage system of repeatable rack units that connect side by side or stack vertically, so capacity grows as your collection does. Start with what fits your wall, then add compatible modules when the rack passes three-quarters full.
- Confirm connector type, rod spacing, rack depth and finish match before buying any add-on unit.
- Reserve roughly a fifth of total capacity as empty slots so new arrivals have somewhere to land.
- Advertised capacities assume standard Bordeaux bottles; magnums need dedicated positions.
- Vertical expansion suits tight footprints but requires secure anchoring and load planning.
- Plan the next module when the rack passes three-quarters full, before it is full.
Table of Contents
- Why Expandable Wine Racking Beats Buying Bigger
- Modular Wine Racks: How the System Actually Works
- Wine Rack Capacity Planning for a Collection That Keeps Growing
- Wine Storage for Small Spaces: Odd Walls, Under Stairs, and Narrow Rooms
- Wine Rack Extension Kits: Adding Storage Without Starting Over
- Structural Safety and Load Planning Before You Expand
- Comparing Expandable Wine Racking Kits by Capacity and Price
- Planning Your Next Rack Expansion
- Frequently Asked Questions
Why Expandable Wine Racking Beats Buying Bigger
Expandable wine racking is a modular storage system built from repeatable rack units that connect side by side or stack vertically, so capacity grows as your collection does.
Buying one oversized unit upfront feels efficient. It rarely is.
Expandable systems invert that. For a deeper look at the benefits and planning behind expandable systems, see Expandable Wine Storage: Key Benefits & Planning.
The rest of this guide covers how modular systems connect, how to plan capacity, and how to expand without rebuilding.
Modular Wine Racks: How the System Actually Works
A modular wine rack is a set of identical or compatible rack elements joined by shared connectors, so each new unit attaches to the last instead of standing alone. That single design decision separates modular systems from one-piece furniture.
Each rack holds a fixed number of bottles. When you add a unit, you extend the same visual line rather than introducing a second, mismatched piece.
Connectors, Shared Walls, and System Compatibility
Compatibility is where most buyers get caught. Two racks from different product lines may look similar in photos but use different connector geometry, rod spacing, or depth. If they don't share the same connection standard, they won't join cleanly.
Before you buy an add-on unit, confirm three things:
- The connector type matches your existing system
- Rod spacing and rack depth are identical
- The finish matches, so the joined sections read as one installation
Wine Rack Capacity Planning for a Collection That Keeps Growing
Capacity planning means matching rack bottle count to how fast you actually acquire wine, not to how many bottles you own today. Most collectors underestimate this by a wide margin, because they count what is on the shelf and forget what is already in transit, on order, or earmarked for aging.
A repeatable method beats guesswork. Work through it once a year to avoid surprises:
- Count what you hold. Include bottles in transit, on order, and in a separate cooler or fridge.
- Estimate two years of intake. Use your last twelve months of purchases as the baseline, then add the bottles you plan to buy for aging or events.
- Add a growth buffer. A common pattern is to reserve roughly a fifth of total capacity as empty slots, so new arrivals have somewhere to land without displacing aged bottles.
- Map the number to rack capacity. Divide your projected total by the capacity of a single repeatable unit to see how many modules you need.
- Round up to the next module. Capacity comes in whole units, so plan to the next step rather than the exact number.
A worked example makes the arithmetic concrete. Suppose you hold 90 bottles, expect to buy about 60 over two years, and want a 20 percent buffer. That projects to roughly 180 bottles of need.
Bottle-Size Compatibility and Real-World Capacity
Advertised capacities assume standard Bordeaux-style bottles. Real-world capacity runs lower once you mix in magnums, oversize Burgundy bottles, or unusually tall Riesling bottles, because anything wider or taller eats into adjacent slots and forces spacing changes.
Three practical rules help keep the math honest:
- Magnums need dedicated positions. A magnum is roughly twice the volume of a standard bottle and will not sit cleanly in a standard row. Plan a section built for them rather than forcing them in.
- Burgundy and Champagne shapes are wider at the base. They reduce the number of bottles a given run can hold, so count them separately when you forecast.
- Tall bottles affect vertical clearance. If a shelf or row is sized for standard height, a tall Riesling or Alsace bottle may not fit above it.
A useful habit is to inventory your collection by format, not just by count: standard, magnum, and oversize. Then match each format to a rack section suited to it.
Forecasting Expansion Without Overbuying
The opposite failure is buying a system so large it dominates the room before the collection fills it. Forecasting avoids both errors by tying each purchase to a trigger rather than a feeling.
A simple trigger system works well:
- When the rack passes three-quarters full, plan the next module.
- When a new format enters the collection (your first magnum, your first case of Burgundy), plan the section that fits it.
- When you move or renovate, re-measure before ordering rather than assuming the old layout still applies.
Because modular systems share a connection standard, each of these steps adds capacity without replacing what you already own. That is the practical difference between forecasting and guessing: the next step is always a compatible add-on, not a new system.
Wine Storage for Small Spaces: Odd Walls, Under Stairs, and Narrow Rooms
Small or awkward spaces reward modular systems more than any other room type.
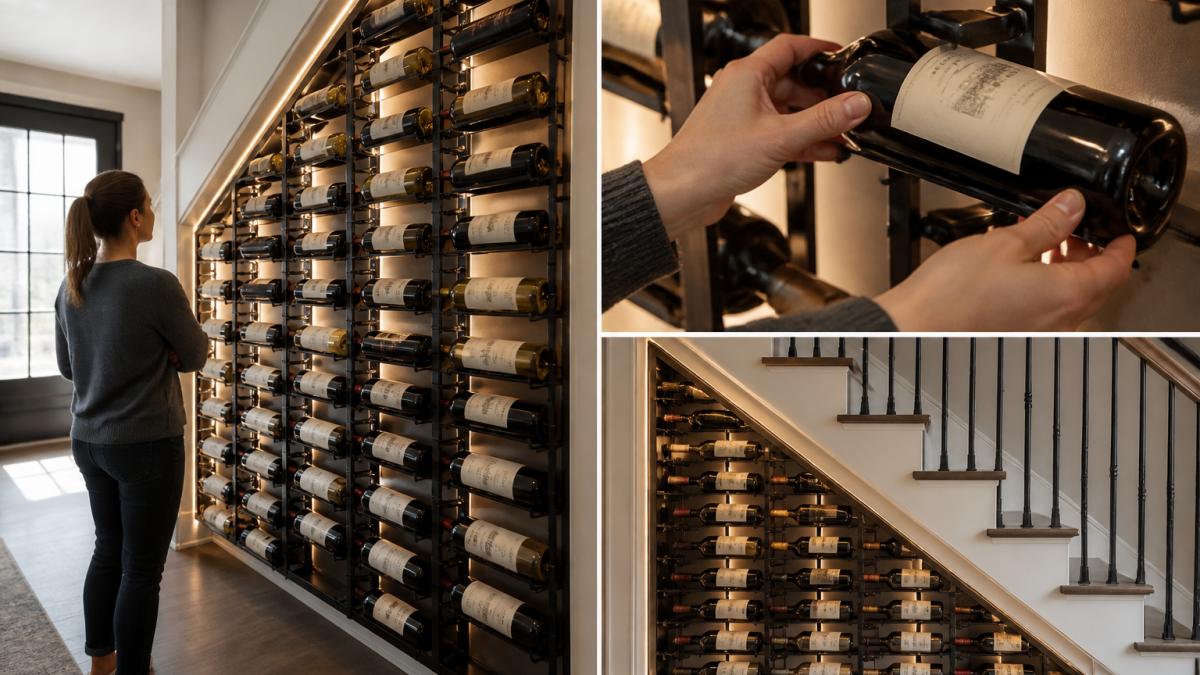 Person admiring a floor-to-ceiling metal wine rack installed in a narrow under-stair alcove with warm lighting
Measure the usable wall, not the room. If you're planning an awkward space, this step-by-step guide to designing under-stair wine storage walks through the process.
Matte Black Modular Wine Rack Display kit Deluxe (15-Piece Set) →
Measuring an Awkward Wall
Irregular walls punish casual measurement. Work through these steps before you choose a configuration:
- Measure at the narrowest point, not the widest. A rack built to the widest point leaves gaps you cannot fill later.
- Record height in segments. Under-stair ceilings slope, so note the usable height at the low end and the high end separately.
- Note obstructions. Outlets, switches, skirting, radiators, and door swings all reduce usable run length.
- Check floor level. A sloped or uneven floor changes how a freestanding run sits and whether it needs leveling.
- Confirm clearance for bottle removal. Label-forward display needs room to pull a bottle out; a tight corner may force a different orientation.
A common pattern in under-stair alcoves is to build the tallest section at the deep end and step down as the ceiling slopes, using the same repeatable units at different heights. Because the units share a connection standard, the stepped run still reads as one installation.
Vertical Versus Horizontal Expansion in Tight Footprints
When floor space is scarce, vertical expansion usually wins. Stacking upward uses the same wall footprint and adds capacity without consuming floor area. The trade-offs are worth knowing:
- Vertical runs need secure anchoring and load planning. The higher the stack, the more the wall and connectors must carry.
- Horizontal runs need uninterrupted wall length. A long galley wall suits side-by-side expansion; a short return does not.
- Mixed runs suit odd geometry. A short horizontal base with a vertical stack above it can fit an alcove that neither pure orientation would.
Placement That Protects the Collection
Small spaces concentrate risk. A rack tucked beside a radiator, a sunny window, or a heat-generating appliance exposes bottles to temperature swings and light that a dedicated cellar would avoid. Keep runs away from direct sun, radiators, ovens, and other heat sources, and favor interior walls over exterior ones where possible. Vibration from a nearby washing machine or a frequently used door is also worth avoiding for bottles you plan to age.
Wine Rack Extension Kits: Adding Storage Without Starting Over
An extension kit adds capacity to an existing rack by supplying the additional rack elements and connectors needed to continue the run.
This is the practical payoff of buying modular in the first place. Readers ready to add capacity can view an actual extension module for a freestanding rack.
Three expansion routes, depending on your wall:
- Side-by-side: extend horizontally along a long wall
- Vertical: stack upward where floor space is tight
- New run: start a second wall and treat the two as one collection
Each route uses the same components, which is why the system stays coherent as it grows.
Structural Safety and Load Planning Before You Expand
Load planning means confirming the wall and the rack system can carry the combined weight of bottles plus hardware before you add another unit. Wine is heavy, and capacity adds up faster than most people expect.
Work through this before any expansion:
- Confirm the wall type and what it can carry
- Calculate total bottle count after expansion, not before
- Check the rack system's rated capacity per unit
If you're unsure about wall capacity, have it checked by a qualified professional before installing. That's not caution for its own sake. A rack that fails takes the collection with it.
Comparing Expandable Wine Racking Kits by Capacity and Price
Choosing between kits comes down to three variables: bottle capacity, footprint, and finish. Price follows capacity closely, so the honest comparison is cost per bottle stored.
| Kit | Capacity | Height | Price | Best for |
|---|---|---|---|---|
| 7-Piece Display Kit | 144 bottles | Standard wall | $1,055 | First dedicated wall |
| WS7 Wine Wall | 315 bottles | 214 cm | $1,760 | Full-wall feature |
| WS8 Wine Wall | 360 bottles | 244 cm | $1,930 | Expansive cellars |
| 15-Piece Deluxe Kit | 288 standard + 32 magnum | Standard wall | $2,420 | Mixed-format collections |
All four come in matte black. Browse the full range of complete modular wine rack kits to compare configurations directly.
Planning Your Next Rack Expansion
Expansion planning means deciding the next capacity step before you need it, so the collection never outgrows the rack. The collectors who avoid the replacement cycle are the ones who plan one step ahead.
A simple annual routine:
- Count bottles currently stored
- Compare against total rack capacity
- If you're above three-quarters full, plan the next unit
- Confirm the wall can take the added load
- Order the matching extension before the rack is full
Before you commit to a layout, it's worth knowing whether the system can move with you. This how-to guide on moving modular wine racks later covers exactly that.
The challenge with any growing collection is that storage decisions made today shape what's possible in three years. VintageView offers modular wine rack systems that can be scaled up over time. Our matte black steel ranges include the 7-piece kit for 144 bottles, the 15-piece deluxe set with 32 magnum positions, and the WS7 and WS8 wine walls at 315 and 360 bottles. Get started with VintageView and build storage that grows with every bottle you add.
Frequently Asked Questions
Can modular wine racks be expanded later?
Yes. Expandable wine racking is designed to grow with your collection, so you can plan additional storage as your needs change. The key is to buy into a system with consistent connector spacing and a stable finish. Plan your first purchase around the wall you can grow into, not just the bottles you own today, and each later expansion becomes an add-on rather than a rebuild.
How do I plan wine storage for a collection that keeps growing?
Start with wine rack capacity planning: count current bottles, add your average monthly purchases, and project 12 to 24 months out. Leave at least one expansion zone, either vertical or side-by-side, on the same wall. Choose a modular wine rack system that offers extension kits, then buy a starter configuration sized to your projected count. Review the plan once a year so you add storage before bottles start stacking on the floor.
What should I check before adding another section to a wine rack?
Check three things. First, system compatibility: confirm the new unit matches your existing rack's design and dimensions. Second, structural safety: confirm the wall and fixings can carry the added load of bottles plus rack. Third, bottle spacing: measure magnums and oversize bottles so the new section accommodates them. Get these right and the addition looks like it was always part of the design.
Can expandable wine racking work in an oddly shaped space?
Modular systems handle triangular, narrow, and stepped walls better than fixed racks because each unit is placed independently and linked through shared walls. Measure the usable height and width at several points, sketch the outline, and plan columns that follow the shape. Modular configurations can suit an awkward alcove better than a wide freestanding rack.
