
Table of Contents
- Why Modular Wine Rack Systems Beat Fixed Racking in 2026
- What to Compare: Materials, Bottle Capacity and Modular Design
- Best Wine Racks for Small Spaces: Wall-Mounted and Floor-Standing Options
- Wine Rack Installation Best Practices for Heavy-Duty Systems
- How to Design a Modular Wine Cellar That Scales With Your Collection
- Budget-to-Scalability: What a Modular Wine Rack Really Costs Over Time
- Frequently Asked Questions
Last Updated: September 11, 2026
Why Modular Wine Rack Systems Beat Fixed Racking in 2026
A modular wine rack is a storage system built from individual, interchangeable sections that can be added to, rearranged, or relocated as a collection grows. Unlike welded fixed racking, modular systems let you start small and scale without rebuilding the wall.
That flexibility matters more than most buyers expect. A collector who owns 40 bottles today often owns 90 two years later, and fixed racking forces an expensive tear-out at exactly that point. This guide from Winerack Solutions breaks down what separates a durable modular system from a decorative one, and how to size it correctly the first time.
Modular racking is a structural decision dressed up as a design decision. Get the structure and capacity math right, and the aesthetics follow.
What to Compare: Materials, Bottle Capacity and Modular Design
Three variables decide whether a modular wine rack system holds up: material, rated bottle capacity, and how the modules connect. Everything else is finish and styling.
Solid Wood vs Metal Display Racking
Metal display racking, particularly steel, handles the opposite conditions. Powder-coated steel resists humidity swings, carries higher load ratings per fixing point, and supports label-forward orientation, which turns storage into display (nist.gov). For wall-mounted configurations, steel is the more honest choice: it doesn't warp or sag under a dense load.
How to Calculate Bottle Capacity Before You Buy
Measure the usable wall or floor footprint, then divide by the bottle pitch of the system you're considering. A compact wall module holding 3 bottles label-forward occupies roughly the width of a single bottle plus clearance, so capacity scales almost linearly.
| Configuration | Typical Capacity | Best For | Footprint |
|---|---|---|---|
| Single wall module | 3 bottles | Tasting corners, small apartments | Narrow alcove |
| Stacked wall columns | 12-36 bottles | Growing collections | Standard wall run |
| Floor-standing units | 60-200+ bottles | Cellars, restaurants | Dedicated floor area |
| Mixed wall and floor | 40-150 bottles | Odd-shaped spaces | Under stairs, hallways |
Work out your realistic three-year ceiling, not your current count. Buying to today's number is the single most common mistake in this category.
Best Wine Racks for Small Spaces: Wall-Mounted and Floor-Standing Options
For small spaces, wall-mounted modular racking almost always wins. It uses vertical wall area that's otherwise wasted, keeps the floor clear, and displays bottles label-forward so a 12-bottle collection looks deliberate rather than cramped. But "wall-mounted" is three decisions, and the wrong one wastes the alcove you bought the system for.
Label-forward vs. neck-forward orientation. Label-forward modules present the bottle horizontally with the label facing out. Each bottle occupies roughly one bottle width plus a small clearance gap, so a 3-bottle module fits a run about 30-35 cm wide depending on bottle diameter. Neck-forward modules pack bottles more tightly per linear metre, but you lose the display effect and need more depth clearance. For a visible hallway or tasting corner, label-forward wins; for a utility space where you only need density, neck-forward wins.
Column stacking vs. horizontal runs. A single wall column concentrates load on one vertical line of fixings, efficient but unforgiving if one fixing point is weak. A horizontal run spreads load across more studs and is easier to level, but consumes more wall length. In a narrow alcove, stack vertically; in a wide but shallow wall, run horizontally.
Floor-standing as a base, not a replacement. Floor-standing systems earn their place when you need volume. They carry more weight per unit, are easier to reconfigure without wall fixings, and suit cellars or restaurant back-of-house areas. The most space-efficient small-room layout is usually a floor-standing base unit with wall modules above it: the base takes the heavy bottles low, and the wall modules use airspace you were never going to walk through.
| Small-space scenario | Recommended configuration | Why |
|---|---|---|
| Narrow alcove, under 30 bottles | Vertical wall column, label-forward | Uses height, zero floor footprint |
| Wide shallow wall, 30-60 bottles | Horizontal wall run, label-forward | Spreads load across studs, reads as display |
| Under-stair or sloped ceiling | Mixed: low floor base + short wall modules | Fits irregular geometry |
| Rental or frequently rearranged space | Floor-standing only | No wall fixings, fully relocatable |
| Utility room, max density | Neck-forward wall modules | Highest bottles per linear metre |
The practical rule: under 30 bottles and short on floor area, go wall-mounted. Past 60 bottles or expecting to be, plan a floor-standing base with wall modules above it. Between 30 and 60, wall geometry decides, not bottle count.
 W S S H 3 D Ka
Airflow and Cooling Efficiency in Tight Spaces
A wall of bottles changes how air moves through the room, and that changes how hard your cooling unit has to work.
Modular racking placed tight against a wall creates a still-air pocket behind and between modules, which can run warmer or more humid than the room average, exactly where your least-visible bottles sit. Two habits fix it: leave a small gap between the rack and the wall so air circulates behind the bottles, and avoid boxing the rack into a corner where the cooling unit's return airflow is blocked.
If you run a Wi-Fi temperature and humidity sensor, place one probe inside the rack itself, not just on the room wall. A common pattern among collectors with compact cellars is a 2-4 °C spread between the room sensor and the in-rack sensor; if you see that, check airflow before assuming the cooler is failing (ucdavis.edu).
Wine Rack Installation Best Practices for Heavy-Duty Systems
Wine rack installation best practices start with the wall, not the rack. Identify studs or masonry, confirm the substrate can carry the loaded weight, then mark your layout, every step after drilling is harder to undo. kitchen layout tips.
A workable sequence:
- Locate studs or solid masonry across the full intended run
- Mark a level datum line before drilling anything
- Fix the first module, then check level again before continuing
- Load progressively and re-check fixings after 48 hours
- Leave expansion room at the end of the run for future modules
For heavy-duty systems, use fixings rated well above the expected load. A full column of bottles is heavier than most people estimate, and the safety margin is not optional.
Load Math: Why "It Feels Solid" Is Not a Test
A standard 750 ml bottle weighs roughly 1.2-1.5 kg, and heavier glass and magnums push past 2 kg (peer-reviewed research). A 36-bottle wall column therefore carries 45-55 kg of glass and liquid before the rack's own frame weight. That load concentrates at the fixing points and shifts every time a bottle is added or removed.
This is why the pull-out strength of the fixing matters more than the rack's rated capacity: a rack rated for 60 bottles is only as strong as its weakest fixing. Fix into studs or masonry wherever possible using the rack's rated fixing pattern, and distribute heavy bottles across the lowest modules so no single fixing point carries a disproportionate share.
If you are mounting onto a substrate you cannot verify, older plaster, a cavity wall, a partition, the honest answer is to reduce the load per module or move to a floor-standing base rather than guess at the fixing's capacity.
Seismic Safety and Long-Term Stability
Seismic safety is where most modular racking advice stops short. In earthquake-prone regions, an unsecured wall rack becomes a falling load and bottles become projectiles, and the failure is not gradual. A rack that has held for years can release all at once.
Three measures reduce that risk:
- Anchor to structure, not surface. Every module should be fixed into studs, masonry, or a verified structural substrate. Surface-only fixings into plasterboard or drywall are the single most common weak point.
- Brace above head height. Modules stacked above roughly 1.8 m should be braced or tied back, because a tall column amplifies lateral movement. If you cannot brace a high module, keep it light or leave it out.
- Keep mass low. Store the heaviest bottles, magnums, fortified wines, dense glass, in the lowest modules. This lowers the centre of gravity of the whole assembly and reduces the leverage a lateral force applies to the top fixings.
Check local building guidance, since seismic bracing rules vary by jurisdiction and wall type. Either way, the principle is the same: the rack should be restrained against tipping, not merely held against the wall.
Stability over time matters too. Re-tighten fixings annually and inspect after any significant event, an earthquake, a renovation, or a heavy bump during a move. Hairline cracks around fixing points, a rack out of level, or bottles that have shifted on their own all signal a re-check of the whole run, not just the affected module.
Long-Term Material Care in Humid and Cellar Environments
Installation is not finished when the last fixing is tightened; it is finished when the system can survive a decade of cellar conditions. Two material failure modes are worth planning for.
On steel racking, the risk is oxidation at fixing points and cut edges, where the protective coating is thinnest. Any scratch reaching bare metal becomes a corrosion site in a damp cellar. At install, touch up exposed metal with a matching coating and keep the rack clear of condensate lines from cooling units.
On the wall itself, the risk is moisture migration. A rack mounted flush against a cold exterior wall can trap condensation behind it, damaging both wall and rack. The same ventilation gap that helps airflow also gives moisture somewhere to go.
For routine care, wipe powder-coated steel with a dry or barely damp cloth and avoid abrasive cleaners. Inspect fixings and coating annually, ideally before the season when your cellar works hardest.
How to Design a Modular Wine Cellar That Scales With Your Collection
Designing a modular wine cellar that scales means planning the wall run for your five-year capacity, then installing only what you need now. The empty space is your expansion allowance.
Start with the room's constraints: ceiling height, door swing, and climate equipment. Then map modules in a consistent grid so future additions match visually, a single module style repeated across a wall reads more intentional than three different styles.
Smart Home Climate Control and Long-Term Material Care
Smart home climate control integration is the angle most buyers overlook. Wi-Fi temperature and humidity sensors are inexpensive and let you catch a failing cooler before it damages labels and corks.
Target stable conditions rather than a specific number, and log the data.
Budget-to-Scalability: What a Modular Wine Rack Really Costs Over Time
The budget-to-scalability ratio is the number that matters: total cost divided by usable capacity over the system's life. A cheaper rack you replace in two years costs more than a durable one you extend module by module.
Winerack Solutions builds its modular systems around exactly this logic. The Winerack Wall Serie W11 holds 3 bottles label-forward in a compact matte black steel frame, priced at €54.45. It's the entry module: buy one for a tasting corner, or stack several to build a wall run as the collection grows. Because the modules share the same fixing pattern and finish, expansion is additive rather than a rebuild.
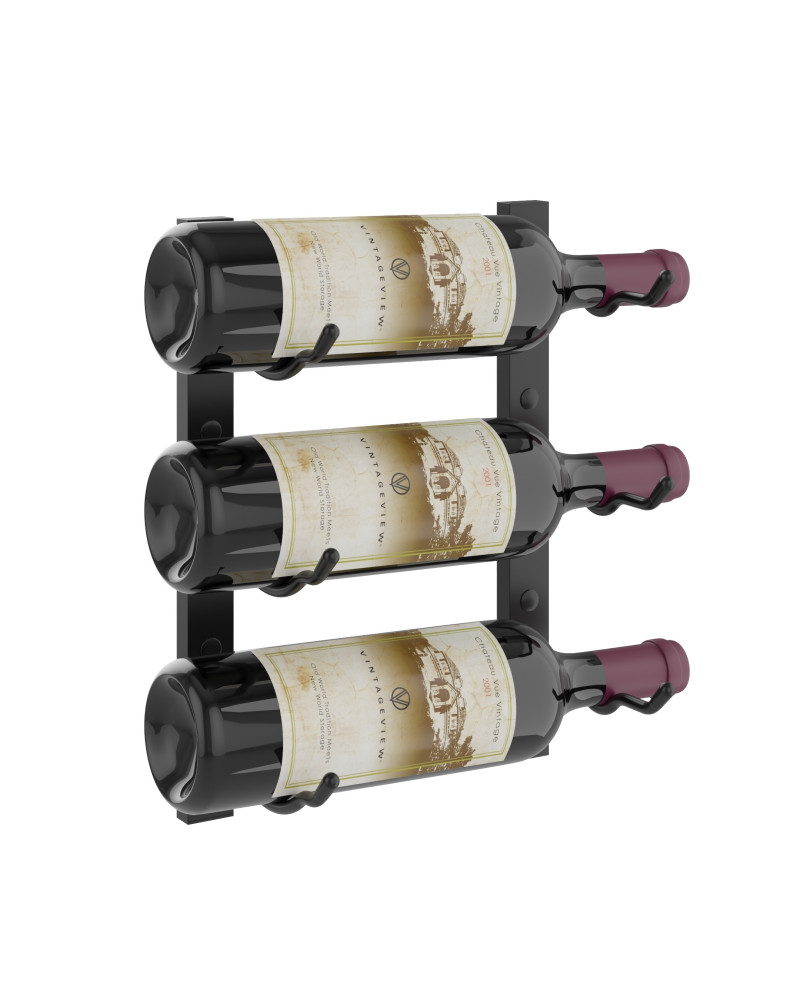 Winerack Wall Serie W11 - Depth 1 bottle
That's the real difference between modular and fixed. Fixed racking is a one-time purchase with a hard ceiling; modular racking is a system you keep adding to, so the cost per usable bottle falls the longer you own it.
Frequently Asked Questions
What is the best modular wine rack for a small or oddly shaped space?
Look for a system built from single-bottle units that can be stacked and angled around corners. Compact wall-mounted modules, such as the Wall Serie W11 in matte black, hold three bottles label-forward and can be repeated across a narrow wall or under-stair alcove. Because each unit is a separate piece, you can fit triangular or awkward zones that a fixed rack cannot fill, then add modules later as your collection grows.
How do modular wine rack systems allow for collection growth?
Each module is self-contained, so expansion means adding units rather than replacing the whole system. Start with a small wall-mounted configuration, then extend sideways or upward using the same fixing pattern and finish. This keeps the look consistent and avoids the common problem of outgrowing a fixed rack within two years. Check that the brand offers the same finish and fixing standards over time before you commit.
Is it better to store wine horizontally or vertically in modular racks?
Horizontal storage keeps the wine in contact with the cork, which helps prevent the cork from drying out during long cellaring. Vertical storage suits bottles you plan to open within weeks. Most modular systems offer both: label-forward horizontal display for showpieces and upright positions for everyday bottles. For anything you intend to keep for years, horizontal orientation with the label facing out is the safer default.
What materials hold up best for long-term modular wine storage?
Powder-coated steel is a durable option. Steel resists humidity and holds heavy loads with slim profiles, which suits compact wall-mounted layouts. Whichever you choose, check the finish quality in person or in close-up photos, and confirm the fixings are rated for the full weight of a loaded rack, not just the empty frame.
Most wine storage decisions fail on capacity planning, not on style. Winerack Solutions designs modular systems that let you start with a single wall module and scale to a full home cellar without re-drilling a thing, using powder-coated steel frames, label-forward display, and a consistent finish across every module. If you want storage that grows with the collection instead of capping it, browse the Winerack Solutions range and build your first run today.